2023-2026 Toyota Models AC Leak Detection TSB
Toyota has issued T-SB-0058-23 Rev1 to detail procedures for identifying and repairing air conditioning refrigerant leaks using dye injection and O-ring joint inspections for various 2023-2026 models.
 Marcus Weber2023 Toyota Camry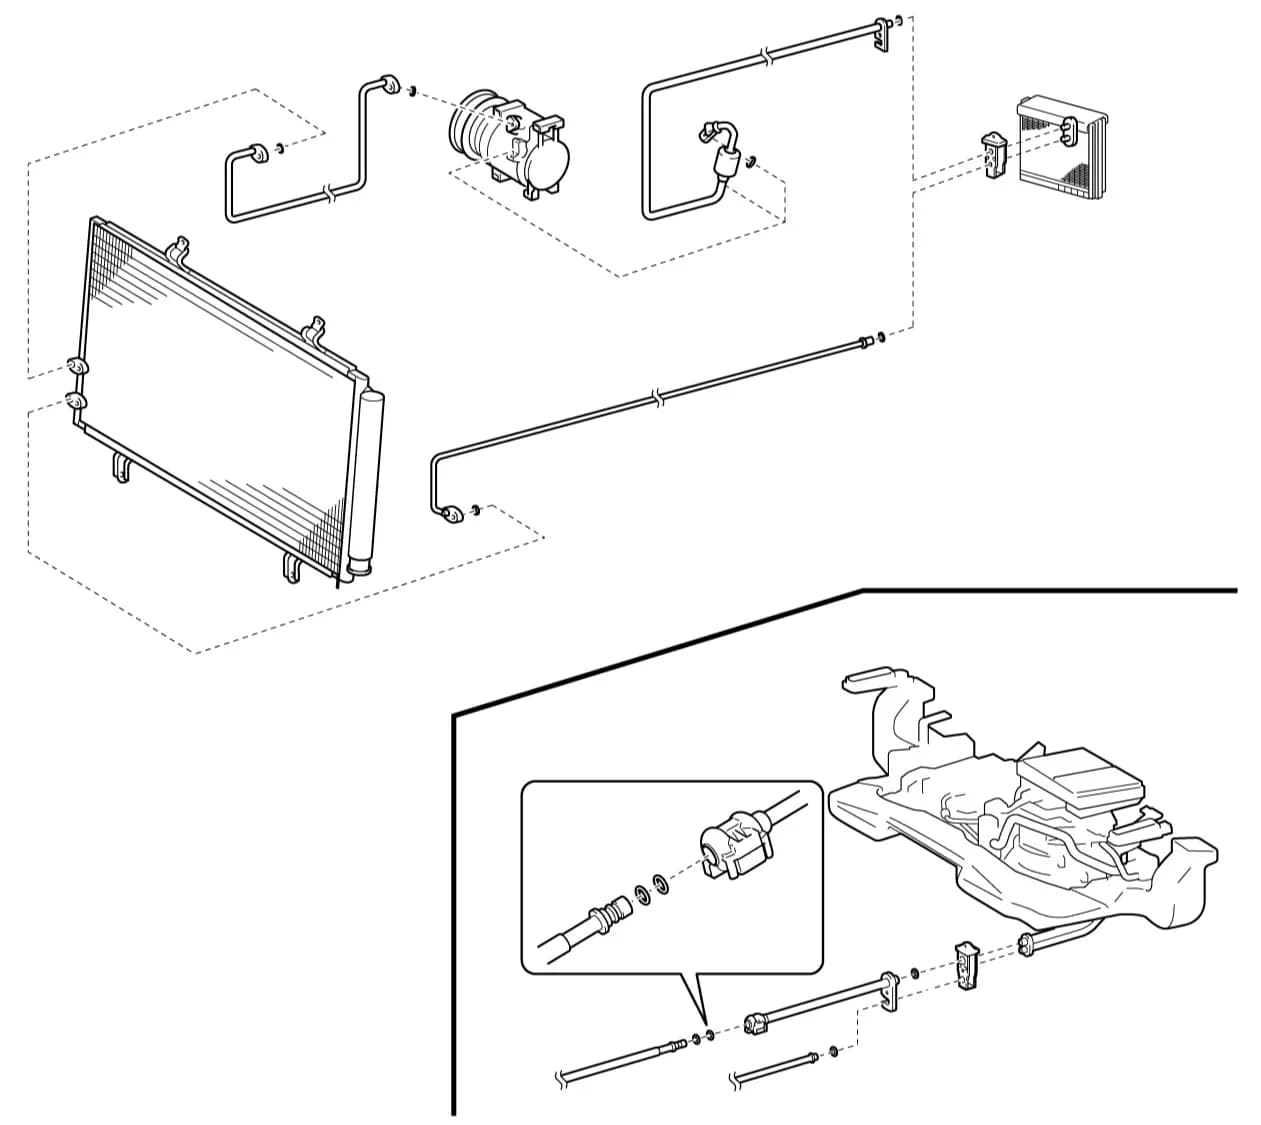
Si applica anche a
- Toyota 4Runner
- 2021–2025
- Toyota Avalon
- 2021–2022
- Toyota bZ4X
- 2023–2025
- Toyota Camry
- 2021, 2022, 2024, 2025
- Toyota Corolla
- 2021–2025
- Toyota Corolla Cross
- 2022–2025
- Toyota Crown
- 2023–2026
- Toyota Crown Signia
- 2025
- Toyota GR Corolla
- 2023–2025
- Toyota Grand Highlander
- 2024–2025
- Toyota Highlander
- 2021–2025
- Toyota Land Cruiser
- 2021
- Toyota Mirai
- 2021–2025
- Toyota Prius
- 2021–2025
- Toyota RAV4
- 2021–2025
- Toyota Sequoia
- 2021–2022
- Toyota Tacoma
- 2024–2025
- Toyota Tundra
- 2021–2025
- Toyota Yaris
- 2023, 2025, 2026
▸ Mostra altri 13▾ Mostra meno
Introduction
Toyota has released Technical Service Bulletin (TSB) T-SB-0058-23 Rev1, dated August 21, 2023, to provide detailed instructions for identifying and repairing air conditioning (AC) refrigerant leaks across a wide range of its 2023-2026 models. This bulletin focuses on using a specialized dye injection tool kit and conducting thorough O-ring joint inspections to pinpoint the exact location of leaks. This TSB is crucial for maintaining optimal AC performance and preventing further system damage.
Revision History
This bulletin, T-SB-0058-23 Rev1, was updated on June 13, 2025. The revision included updates to the applicability list, incorporating various 2017-2026 model year vehicles such as the Prius Prime, Sienna, Crown, Yaris, Raize, Venza HV, 86, 4Runner, Avanza, bZ4X, Camry, Corolla, Highlander, Hiace, Land Cruiser, Mirai, RAV4, and Tundra. Additionally, the Introduction, Parts Information, Required Tools & Equipment, and Air Conditioning Leak Detection Dye and Injection Tool Use sections were updated. Any previously printed versions of this bulletin should be discarded to ensure technicians are using the most current procedures.
Symptoms of an AC Refrigerant Leak
Owners of affected Toyota vehicles, including the Toyota Camry, might notice a decrease in the effectiveness of their air conditioning system. Common symptoms of an AC refrigerant leak include the AC blowing warm air, the system running constantly without cooling, or unusual noises coming from the AC compressor. These symptoms indicate a potential loss of refrigerant, which can lead to reduced comfort and potential damage to AC components if not addressed promptly.
Important Warnings for Technicians and Owners
This TSB includes several critical warnings to ensure safety and proper procedure:
- UV Light Safety: Do NOT look directly into the UV flashlight and ALWAYS wear UV protection glasses.
- Tool Connection Safety: Wear safety glasses when connecting/disconnecting the dye injection tool from the air conditioning service port.
- System Operation: Do NOT operate the air conditioning system while the dye injection tool is connected to the AC system.
- Evacuated Systems: Do NOT connect the dye injection tool to a system that is evacuated.
- Refrigerant Requirement: The air conditioning system MUST contain enough refrigerant to operate the compressor and circulate the dye to find leaks.
- Dye Mixing: Do NOT mix ND-11 and ND-12 dyes. ALWAYS use the dye cartridge with the designated injector tool brass coupler.
- Dye Disposal: Dispose of ANY dye in accordance with all local, state, and federal regulations.
- O-ring Reuse: Do NOT reuse the O-rings once they are removed.
- Component Replacement: As there may be a malfunction in multiple components, make sure to complete ALL steps and replace ALL parts in which defects are found.
- Temporary Leaks: If no malfunction is found in ANY related parts, a temporary leak may have occurred due to foreign matter on an O-ring, deformation, etc.
- Disassembly Preparation: Wipe off the joint area with a clean cloth BEFORE disassembly. Slowly remove pipes straight to prevent sealing face damage and foreign material drop-off.
- O-ring Removal: When removing O-rings, use soft tools (such as a toothpick) to avoid damaging the sealing face or the O-ring.
- Surface Inspection: Make sure NOT to lose any foreign material that was adhering to the surface that may indicate the source of the leak.
- Compressor Oil Compatibility: ND-8 compressor oil is NOT compatible with ND-12 oil systems.
Required Tools and Parts
Technicians performing these inspections and repairs will utilize specific tools and parts, including:
- Dye Cartridges: ND-11 A/C Dye Cartridges (Part Number: 00289-DYE11) and ND-12 A/C Dye Cartridges (Part Number: 00289-DYE12). These are for Denso AC systems only and are available through ZEP Products via the TCMC (Toyota Complete Maintenance Care) Program website via Dealer Daily. Each part number contains two dye cartridges.
- Brass Couplers:
- R-134a / Brass Coupler (for ND-11): 09870-10010-Y
- R-1234yf / Brass Coupler (for ND-11): 09870-20010-Y
- R-134a / Brass Coupler (for ND-12): 09870-10010-B
- R-1234yf / Brass Coupler (for ND-12): 09870-20010-B
- Injector Handle: 09870-TP9845
- Ultraviolet (UV) Flashlight: 09870-TPOPUVP
- Flashlight Charger: 09870-0TP14
- GLO-AWAY + Dye Cleaner: 09870-0TP19
- Yellow Glasses: 09870-TP9940
- Case: 09870-CASE
- A/C Machines: R1234YF A/C Machine and R134A A/C Machine.
Replacement components for the dye injection tool kit can be ordered by calling Approved Dealer Equipment (ADE) at 1-800-368-6787 (USA) or 01-55-50103041 (Mexico).
Warranty Information
This service bulletin notes that warranty information is "Not Applicable to Warranty" for both USA and Mexico markets. This means that the procedures outlined are for diagnostic and repair guidance, and the cost of repairs may not be covered under standard warranty, depending on the specific circumstances of the AC leak.
Air Conditioning Leak Detection Procedure
To accurately locate AC refrigerant leaks, technicians follow a precise dye injection procedure. Two dye cartridges are required per vehicle service. The first cartridge is completely purged through the brass coupler to ensure no contaminants like moisture or air are introduced. The second cartridge is then injected into the AC system.
- Identify System Type: The technician first identifies the compressor oil and refrigerant system type (R-134a or R-1234yf) by checking the under-hood AC label. This determines the correct dye injector tool brass coupler to use.
- Prepare Dye Injection Tool: The dye injection tool is prepared by removing the large cap from the first dye cartridge. The handle on the injector is completely unscrewed, and the dye cartridge is screwed into it, ensuring the piston rod remains fully unscrewed.
- Purge First Cartridge: The purge fitting is removed from the brass coupler. The cartridge is held vertically with the small cap on top, then the cap is removed, and the cartridge is screwed firmly to the brass coupler. The purge fitting is reinserted. While holding the tool vertically, the plunger is advanced until all dye is passed out of the cartridge, completing the purge process. The purge fitting is then removed, and the first empty cartridge is unscrewed and disposed of.
- Install Second Cartridge: The second dye cartridge is installed onto the brass coupler.
- Final Purge: The purge fitting is installed to the brass coupler, and the handle is turned to advance the plunger until a small amount of fluorescent dye exits the purge fitting, indicating the tool is fully purged and ready for use.
- Connect to AC System: The brass coupler is connected to the low-side service port. A shop rag should be wrapped around the connection as a small amount of dye may spray out due to refrigerant pressure.
- Inject Dye: The plunger is turned clockwise to inject all the dye into the vehicle's AC system.
- Circulate Dye: After disconnecting the brass coupler and wiping it clean, the engine is started, the AC switch is turned ON, the temperature is set to MAX COOL, and the compressor is run for 10 minutes to circulate the dye throughout the system.
- Inspect for Leaks: The AC and engine are turned OFF. Wearing UV glasses, the technician uses a UV flashlight to check for refrigerant leaks along all AC system components. Areas with leaks will glow a bright yellow-green. For smaller leaks, the AC system may need to operate for 24 to 48 hours before re-inspection.
- Clean Up: After repairs, GLO-AWAY dye cleaner and a UV flashlight are used to clean the area and ensure no dye remains.
AC Component Inspection Areas
Figure 8 in the TSB illustrates the refrigerant line and identifies key inspection areas: 'A' for the Expansion Valve and Evaporator, 'B' for the Condenser, 'C' for the Compressor, and 'D' for Other Joint Areas. Each area requires specific inspection steps.
Expansion Valve and Evaporator Inspection
This inspection focuses on the pipe fitting areas of the expansion valve and evaporator. Technicians remove the pipes from the expansion valve, carefully wiping the joint area clean before disassembly. The O-rings are removed using soft tools like a toothpick to prevent damage. Both the O-rings and the pipe surfaces are inspected for defects such as cuts, dents, crushed areas, foreign material adhesion, or corrosion. The sealing surfaces of the expansion valve (pipe side) and the evaporator are also thoroughly examined. If any defects are found, the parts are cleaned or replaced. It is critical not to lose any foreign material found, as it may indicate the source of the leak.
Condenser and Pipe Fitting Area Inspection
For the condenser, the discharge and liquid pipes are removed. Similar to other components, the joint area is cleaned, and O-rings are removed carefully. The O-ring surfaces and pipe surfaces are inspected for any defects, foreign material, or corrosion. The sealing surfaces of the condenser are also checked for abnormalities. Any defective parts are cleaned or replaced.
Compressor and Pipe Fitting Area Inspection
The discharge and suction pipes are removed from the compressor. The O-ring surfaces and pipe surfaces are inspected for damage, foreign material adhesion, or twists. The sealing surface of the compressor is also examined for defects. If issues are found, the parts are cleaned or replaced.
Other Joint Areas Inspection
Finally, any other joints within the AC system are inspected. This involves examining the O-ring surfaces of the pipes or parts and their corresponding sealing surfaces for defects, foreign material, or corrosion. As with all other areas, defective components are either cleaned or replaced.
Judgment Criteria for O-rings and Sealing Surfaces
Technicians use specific criteria to determine if O-rings and sealing surfaces are acceptable or require attention.
O-ring Abnormalities
An O-ring is considered in "OK CONDITION" if there are NO cuts, dents, crushed areas, foreign materials, or twists. Abnormalities include:
- CUT: Visible cuts on the O-ring surface.
- DENT / CRUSHED AREA: Indentations or flattened sections on the O-ring.
- FOREIGN MATERIAL: Presence of metal fragments, resin fragments, lint, or hair on the O-ring.
- TWIST: The O-ring is twisted or deformed from its original shape.
Sealing Surface Abnormalities (O-ring Attachment Area)
For the O-ring attachment area, "OK CONDITION" means that processing evidence in the circumferential direction is NOT a cause of leakage. Abnormalities include:
- FOREIGN MATERIAL: Metal fragments, resin fragments, lint, or hair on the sealing surface.
- DAMAGE: Physical damage to the sealing surface.
- CORROSION: White and yellow materials adhered (corrosion product), scratches in the axial direction, or black discoloration.
Sealing Surface Abnormalities (Part Joint Area)
For the part joint area, "OK CONDITION" also means that processing evidence in the circumferential direction is NOT a cause of leakage. Abnormalities include:
- FOREIGN MATERIAL: Metal fragments, resin fragments, lint, or hair on the joint surface.
- DAMAGE: Physical damage to the joint surface.
- CORROSION: Uneven discoloration (black) on the sealing surface.
Owner Action
If you experience symptoms of an AC refrigerant leak, such as your Toyota Camry AC blowing warm air, it is recommended to have your vehicle inspected by a qualified technician. While this TSB provides repair guidance, it is not a recall, and warranty coverage for the repair may vary. Prompt diagnosis and repair can prevent further damage to your AC system.
NHTSA ID: T-SB-0058-23
Galleria
26 immagini
Frequently Asked Questions
- What is Toyota T-SB-0058-23 Rev1 about?
- Toyota T-SB-0058-23 Rev1 is a Technical Service Bulletin that provides detailed procedures for technicians to detect and repair air conditioning (AC) refrigerant leaks in various 2023-2026 Toyota models. It outlines the use of a dye injection tool kit and thorough inspections of O-rings and sealing surfaces.
- How do technicians find AC leaks using this bulletin?
- Technicians inject a fluorescent dye into the AC system, circulate it, and then use a UV flashlight and special glasses to inspect all AC components. Areas where refrigerant is leaking will glow a bright yellow-green due to the dye. This method helps pinpoint the exact location of the leak.
- What are common O-ring abnormalities that cause AC leaks?
- Common O-ring abnormalities that can cause AC leaks include cuts, dents, crushed areas, foreign material (like metal fragments, resin fragments, lint, or hair), and twists. Sealing surfaces can also show damage, corrosion (white/yellow materials), or uneven discoloration.
- Is this a recall for my Toyota Camry AC leak?
- No, T-SB-0058-23 Rev1 is a Technical Service Bulletin, not a recall. It provides guidance to dealership technicians on how to diagnose and repair a specific issue. While it addresses a potential problem like a Toyota Camry AC leak, it does not mandate a free repair for all affected vehicles unless covered by warranty or a separate recall campaign.
- What tools are required for this AC leak detection process?
- The process requires specific tools such as ND-11 and ND-12 A/C Dye Cartridges, various brass couplers for different refrigerant types (R-134a, R-1234yf), an injector handle, a UV flashlight with charger, GLO-AWAY dye cleaner, yellow UV glasses, a carrying case, and R1234YF and R134A A/C Machines.
Related Articles
2021-2024 Toyota Low Oil Pressure DTCs P05202A P052477
An obsolete Lexus Technical Service Bulletin (L-SB-0021-25) addressed issues in certain 2021-2024 Toyota models, including the Toyota Camry, related to low oil pressure DTCs P05202A and P052477, a MIL ON, and milky/discolored engine oil in freezing temperatures. This bulletin was declared obsolete…
2018-2024 Toyota Head Unit Data Download Instructions TSB
Toyota's Tech Tip T-TT-0780-25 provides detailed instructions for technicians to download Multimedia Recorder (MMR) data from the head unit of various 2018-2024 models. This data helps diagnose audio, connectivity, and screen-related concerns.
2021-2024 Toyota Navigation Map Update TSB
Toyota has issued Technical Service Bulletin T-SB-0106-22 detailing the process for updating navigation maps and system software on 2021-2024 Toyota vehicles equipped with Premium Audio and Dynamic Navigation Systems. This update requires a Special Service Tool (SST) USB flash drive and may…
2023-2025 Toyota Wheel Film for Brake Rotor Rust
Toyota Technical Service Bulletin T-SB-0038-24 describes the use of wheel film on 2023-2025 Toyota vehicles to prevent brake rotor rust during transportation and storage. This film should remain on the wheels until just before customer delivery. Learn about its purpose and removal.
2022-2024 Toyota Camry, RAV4 Oil Leak from Engine Oil Level Sensor
Toyota has identified a potential issue with oil leaks originating from the Engine Oil Level Sensor area in certain 2022-2024 Camry and RAV4 vehicles. This Tech Tip advises technicians on how to handle and report these leaks to Toyota's technical assistance.
Leave a comment
Comments are moderated and may take a moment to appear. Only your first name and the initial of your last name are shown publicly.
Comments
Be the first to comment.