2014-2023 Nissan Infotainment System Software Update
Nissan TSB NTB23-018E provides a software update for the AV Control Unit to resolve infotainment system issues and improve stability across various 2014-2023 Nissan models, including the Altima, Sentra, and Rogue.
 Ahmet Topcu2023 Nissan Sentra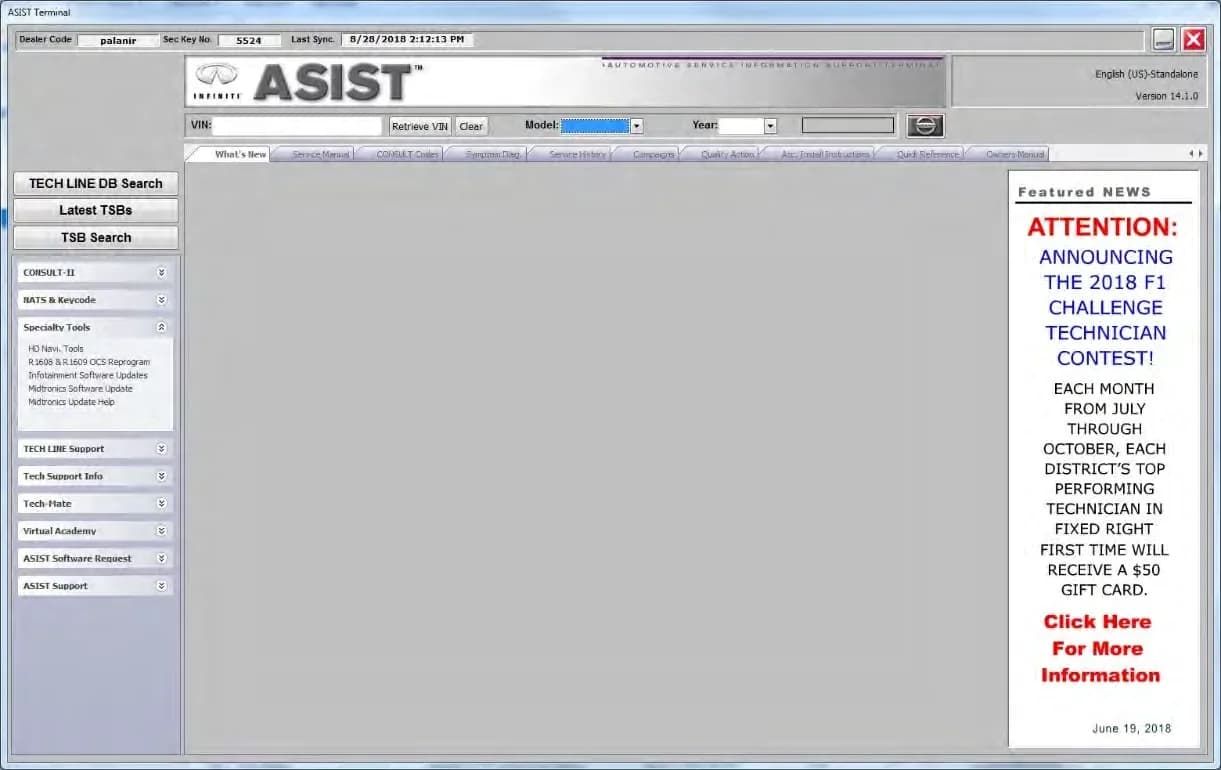
S'applique également à
- Nissan Altima
- 2021–2023
- Nissan Armada
- 2021–2023
- Nissan Frontier
- 2021–2023
- Nissan Kicks
- 2021–2023
- Nissan Leaf
- 2021–2023
- Nissan Maxima
- 2021–2023
- Nissan Murano
- 2021–2023
- Nissan NV
- 2021
- Nissan NV200
- 2021
- Nissan Pathfinder
- 2022–2023
- Nissan Rogue
- 2021–2023
- Nissan Rogue Sport
- 2021–2022
- Nissan Sentra
- 2021–2022
- Nissan Titan
- 2021–2023
- Nissan Versa
- 2021–2023
▸ Afficher 9 de plus▾ Afficher moins
Nissan has issued Technical Service Bulletin (TSB) NTB23-018E to address a range of infotainment system issues affecting numerous models from 2014 to 2023. This bulletin outlines the procedures for verifying the current software version of the Audio/Video (AV) Control Unit and performing necessary software updates to enhance stability and resolve reported bugs. Owners of affected vehicles experiencing problems with their infotainment systems, such as Nissan Sentra infotainment issues, should be aware of this important update.
Why This Matters
The infotainment system is a central component of modern vehicles, providing navigation, entertainment, and connectivity. Issues with this system can significantly impact the driving experience and functionality. This software update aims to resolve these problems, ensuring a more reliable and stable operation of the AV Control Unit.
Symptoms
Owners may experience various issues with their infotainment system, including instability, unexpected behavior, or other software-related glitches. These problems can manifest as slow responses, freezing, or incorrect display information. This TSB specifically targets these general infotainment issues.
What Owners Should Know
This technical service bulletin provides crucial information for both technicians and owners regarding the software update process. It's important to understand the following warnings and advisories:
- Incorrect Software Installation: To avoid damage to the vehicle, do not install any software into the vehicle if the software version for a current model year vehicle is not listed in the Software History section of the table. Doing so may cause the software to be downgraded and create new issues for the infotainment system.
- USB Drive Usage: Only use the special tool USB drive J-52727-1 (new tool number NI-52727-1) for this procedure. Do not use any other USB drive to perform the procedure in this bulletin. The update-software must be the only file on the USB drive.
- Charging Ports: Do not insert the USB drive into a charging port. If used, the update-software and/or USB drive may become damaged. Only insert the USB drive in a USB media port. Charging ports are marked in the vehicle with a “lightning bolt” symbol.
- During Update: Do not remove the USB drive during the update process until specifically instructed by the on-screen prompts. Interrupting the update prematurely can corrupt the AV Control Unit. If removed prior to the "Software Update is completed" screen, the AV Control Unit may be damaged.
- Ignition Status: Do not turn the ignition OFF during critical phases of the software installation. The vehicle's hazard warning lamps must remain ON until the software update has been completed to prevent the Body Control Module (BCM) from entering battery saver mode.
- Continuous Reboots: If, after performing initial steps, the status message "Update Failed!" is displayed with the direction to “Insert update media” while a countdown from 60 is displayed, or if the AV Control Unit continuously reboots (restarts), insert the USB drive and then skip to the recovery procedure outlined in the bulletin.
- Post-Update Steps: Steps 55-62 (for Install 2) or 92-97 (for Install 5) must be completed. If they are not completed, the update may become corrupted. Ensure that all doors remain closed during the specified 5-minute wait period after opening and closing the driver door. If a door is opened during this period, the update may not complete and the AV Control Unit may become inoperable.
- Bluetooth Re-pairing: After the update and reinitialization, owners must delete/erase the car from the phone's Bluetooth® menu and then re-pair the phone to the vehicle. If this is not performed, the phone may no longer connect with the vehicle.
- Safe USB Removal: Follow the steps to safely remove the USB drive from the CONSULT PC. If not followed, the USB drive may corrupt the infotainment update-software.
- Hardware vs. Software: If the customer is experiencing a software related concern, refer to TSB NTB21-038 to verify if the customer concern is a hardware or software related issue. If the concern is software related, review this bulletin to update the AV Control Unit as needed.
Required Tools and Parts
Performing this software update requires specific tools and software:
- Special Tool USB Drive: J-52727-1 (new tool number NI-52727-1). Additional USB drives may be purchased from Tech-Mate (www.techmatetools.com or 1-833-397-3493). The update-software only needs to be downloaded once and can then be used continuously on multiple applied vehicles.
- CONSULT PC: A Nissan dealer's diagnostic computer connected to the internet and synchronized with ASIST.
- ASIST Software: Nissan's Automotive Service Information System Terminal, used to download the correct infotainment update software package. The download is estimated to take 10-15 minutes.
Software Version Check Procedures
Before performing any update, technicians must first determine the current software version of the AV Control Unit. The TSB details several methods, referred to as "SW Check" procedures, depending on the vehicle's infotainment system type. Due to differences in software versions, the figures throughout this bulletin may not match exactly to the images on the AV Control Unit.
SW Check 1
This procedure applies to certain models and involves checking the software version via the "SERVICE MENU".
- Turn the audio system OFF.
- Access the "SERVICE MENU" by pushing and holding the APPS button, then turning the TUNE-SCROLL knob counterclockwise three or more clicks, clockwise three or more clicks, counterclockwise three or more clicks, and clockwise three or more clicks. Continue this pattern until the "SERVICE MENU" screen is displayed (Figure 2).
- Select "Version" (Figure 2).
- Confirm the current Software version (Figure 3). If it's not the latest version listed in the vehicle table, proceed with the update. If it is the latest, no update is available.
SW Check 2
This procedure applies to other models and involves accessing system information through the infotainment screen.
- Push the MENU button (Figure 4).
- Select the "Info" icon (Figure 5). If the "Info" icon does not appear, this bulletin does not apply.
- Select "System Information" (Figure 6).
- Select "Software Version" (Figure 7).
- Confirm the current Software Version (Figure 8). If it's not the latest version, proceed with the update. If it is the latest, no update is available.
SW Check 3
This procedure is for systems accessed via a diagnostic menu that requires specific knob manipulations.
- Turn the ignition ON and the audio system OFF.
- Access the "System Diagnostic Menu" by pressing and holding the MENU button, then turning the VOLUME knob forty (40) or more clicks in either direction (Figure 9).
- Select "Confirmation / Adjustment" (Figure 9).
- Select "Page DOWN" (Figure 10).
- Select "Version Information" (Figure 11).
- Confirm the current "SYS Software Ver" (Figure 12). If it's not the latest, proceed with the update. If it is the latest, no update is available.
- Important Note: Some infotainment update-software requires two update files (LD001 and a model/year specific file). Only one file is loaded at a time, starting with LD001.
SW Check 4
This check is performed through the settings menu on certain AV Control Units.
- Select "Settings" in the lower right-hand corner of the AV Control Unit display (Figure 13).
- Select "Info" (Figure 14).
- Select "System Information" (Figure 15).
- Select "Version Information" (Figure 16).
- Confirm the current "Software Version" (Figure 17). If it's not the latest, proceed with the update. If it is the latest, no update is available.
SW Check 5
This procedure involves a specific sequence of button presses and knob turns to enter a diagnostic menu.
- While holding the MENU button down, turn the tune knob left-right-left (Figure 18).
- Select "Confirmation/Adjustment" (Figure 19).
- Select "Version Information" (Figure 20).
- Confirm the current "Overall SW version" (Figure 21). If it's not the latest, proceed with the update. If it is the latest, no update is available.
SW Check 6
This check is similar to SW Check 4, navigating through the main menu to system information.
- Starting from the MENU (Home) screen (Figure 22), select "Info".
- Select "System Information" (Figure 23).
- Select "Version Information" (Figure 24).
- Confirm the current "Software Version" (Figure 25). If it's not the latest, proceed with the update. If it is the latest, no update is available.
Infotainment Software Installation Procedures
Once the correct software update file has been downloaded to the special tool USB drive, the installation can proceed. There are several installation methods, referred to as "Install" procedures, depending on the vehicle's system.
Install 1
This procedure involves specific steps to prepare the vehicle and initiate the update via the "SERVICE MENU".
- Connect a battery maintainer or smart charger set to reflash mode.
- Set the parking brake.
- Cycle the ignition to ON, engine OFF.
- Turn ON the hazard warning lamps to prevent the BCM from going into battery saver mode. The hazard warning lamps must remain ON until the software update has been completed.
- Write down the radio settings (AM, FM, SAT presets, BASS, TREBLE, BALANCE, FADE, SPEED SEN. VOL.).
- Turn the audio system OFF.
- Access the "SERVICE MENU" using the APPS button and TUNE-SCROLL knob sequence described in SW Check 1 (Figure 26).
- Select "Version" (Figure 26).
- Select "Update System Software" (Figure 27).
- Insert the USB drive into the AV Control Unit's USB port, then select OK. Do not interrupt download by removal of USB drive or engine start (Figure 28).
- Confirm the Current Version and Media Version are different, then select "Update" (Figure 29). The screen may go black for up to 1 minute, which is normal.
- Wait until the update is complete (up to 35 minutes). The screen will show "STATUS: Reading Medium..." and "copying 1/100" (Figure 30, Figure 31). Do not remove the USB drive during this process.
- When "STATUS: Update successful!" and "Please remove USB Stick" is displayed, remove the USB drive (Figure 32). The system will restart.
- If the message "No SD card is inserted. Please use a Nissan SD card only" appears (Figure 33), eject and re-insert the SD card. Then select "Update" on the "APPLICATION" screen (Figure 34). The system will reboot after "Download successful. System will reboot now." (Figure 36).
Install 2
This procedure is for systems that automatically detect the update from the USB drive.
- Set the parking brake.
- Start the engine and wait 60 seconds for the system to load. The engine needs to idle for the duration of the update to retain battery charge.
- Insert the USB drive with the infotainment update-software into the vehicle's USB media port (Figure 37). Do not remove the USB drive during the update.
- Wait 10-30 seconds for the "Initializing...." screen (Figure 38) to appear, then select OK on the "There is a new software update available." screen (Figure 51). If a "New USB music device detected" message appears (Figure 52), select "No".
- Review the software update requirements (Figure 53) and select "Accept" to start the reprogramming. The vehicle must be stopped with the parking brake ON and engine running. Secure location with proper ventilation is recommended for up to an hour.
- Wait for the update to complete (15-25 minutes). The screen will show "Remaining time ~ 5 min." (Figure 40).
- Once "The software Update has finished. The system will now restart..." is displayed (Figure 41), remove the USB drive. The system will reboot.
- Turn the ignition OFF.
- Open and close the driver door, then ensure all doors are closed.
- Wait 5 minutes. Ensure all doors remain closed during this period.
- Turn the ignition ON (engine OFF) and wait for the Nissan logo (Figure 42) to appear. If the logo doesn't appear within 30 seconds, restart from step 8.
- After the Nissan logo appears, wait 1 minute for the MENU (Home) screen (Figure 43) to display.
- Turn the ignition OFF.
- Repeat steps 9-13 one more time (for a total of 2 times) to complete the update.
Install 3
This procedure requires two update files and involves reinitialization of the AV Control Unit.
- Turn ON the hazard warning lamps and ignition, then turn ON the audio system.
- Write down the radio settings (presets, BASS, TREBLE, BALANCE, FADE, SPEED SEN. VOL.).
- Turn OFF the audio system.
- Insert the special tool USB drive with the first infotainment update-software file (LD001) into the USB media port (Figure 44). Do not use charging ports (Figure 45).
- Select "Yes" to begin the reprogramming process when prompted (Figure 46). Reprogramming takes 5-10 minutes. Do not remove the USB drive until the AV Control Unit reboots and returns to the main MENU screen (Figure 47).
- Remove the USB drive.
- Repeat the download process from ASIST (step 19 on page 49 of the TSB) to load the second update file onto the USB drive.
- Repeat steps 1-6 of this "Install 3" procedure to apply the second update file.
- Perform AV Control Unit initialization:
- Press and hold the Menu button.
- Press and hold the Audio button.
- Press the Seek right button three (3) times. A screen similar to Figure 48 will appear.
- Select the "Next" button.
- On the second page of the menu, press "Factory Cold Start".
- Select "Yes" on the confirmation screen "The memory of a system is eliminated. Are you sure?" (Figure 49). Initialization is complete after the AV Control Unit reboots.
- Turn OFF the hazard warning lamps.
- Restore the radio presets and clock setting.
- Instruct the customer to go into their Bluetooth® phone settings and delete/erase the car from the phone's Bluetooth® menu, then re-pair the phone. If this is not performed, the phone may no longer connect with the vehicle.
Install 4
This procedure is similar to Install 2, focusing on a single software update file.
- Set the parking brake.
- Start the engine and wait 60 seconds for the system to load. The engine needs to idle for the duration of the update to retain battery charge.
- Insert the USB drive with the infotainment update-software into the vehicle's USB media port (Figure 50). Do not remove the USB drive during the update.
- Wait 10-30 seconds for the screen in Figure 51 to appear, then select OK. If a "New USB music device detected" message appears (Figure 52), select "No".
- Review the software update requirements (Figure 53) and select "Accept" to start the reprogramming.
- When "The software update is completed." message is displayed (Figure 54), remove the USB drive. Do not remove the USB drive until this screen is displayed, or the AV Control Unit may be damaged.
- Turn the ignition OFF.
- Open and close the driver door.
- Restart the engine.
- Allow the system to boot up completely (approximately 30 seconds). The Nissan logo (Figure 55) will be displayed during the reboot.
Install 5
This procedure is for systems that require reinitialization after the update.
- Set the parking brake.
- Start the engine and wait 60 seconds for the system to load. The engine needs to idle for the duration of the update to retain battery charge.
- Insert the USB drive with the infotainment update-software into the vehicle's USB media port (Figure 56). Do not remove the USB drive during the update.
- Wait for the update to complete (20-30 minutes). Follow on-screen instructions. The screen will show "Update in progress. Please do not switch off the engine. Note: Parking assistances aren't available during update." (Figure 58).
- Once "Software is successfully updated. Note: parking assistance is not available during update." is displayed (Figure 59), remove the USB drive. The system will reboot.
- Reinitialize the AV Control Unit:
- Press and hold the MENU button on the IT Commander (Figure 60) and turn the AV Control Unit volume knob left-right-left at the same time (Figure 61).
- Select "Confirmation/Adjustment" (Figure 62).
- Select "Initialize Settings" (Figure 63).
- Select "User Data Initialization" (Figure 64).
- Select "Yes" on the "Do you want to delete all data and settings saved in the system?" prompt (Figure 65).
- Select "Yes" again on the "Restore to factory settings. Are you sure?" prompt (Figure 66).
- Instruct the customer to go into their Bluetooth® phone settings and delete/erase the car from the phone's Bluetooth® menu, then re-pair the phone. If this step is not completed, the phone may not connect with the vehicle.
Downloading Software from ASIST
Technicians must use the ASIST system to download the correct software update files. Before starting, ensure the CONSULT PC is connected to the internet and ASIST has been synchronized to the current date.
- Insert the special tool USB drive (J-52727-1 / NI-52727-1) into the CONSULT PC. This is the only approved USB drive for this procedure.
- Open ASIST (Figure 67).
- Select "Specialty Tools", then "Infotainment Software Updates" (Figure 67).
- Select the checkbox next to the appropriate infotainment update-software for the vehicle. Refer to the vehicle table in the TSB to determine the correct software.
- Use the drop-down menu to select the USB drive location.
- Select "Download" (Figure 68). The download is estimated to take 10-15 minutes.
- Select OK when the "Copy Process Completed." message is displayed (Figure 69).
- Safely remove the USB drive from the CONSULT PC by selecting the "Safely Remove Hardware" icon from the PC toolbar (Figure 70). Improper removal may corrupt the software.
- Close all ASIST Infotainment Software Update screens.
Warranty Information
Claims for this service should be submitted using a Primary Part (PO) type line claim with the following coding:
| CLAIM IDENTIFIER | DESCRIPTION | OP CODE | SYM | DIA | FRT |
|---|---|---|---|---|---|
| CL1 | Perform Software Check and Update the AV Control Unit | QX42AA | 0.4 | ||
| CL2 | Perform Software Check and Update the AV Control Unit | RX4SAA | 0.3 | ||
| CL3 | Perform Software Check and Update the AV Control Unit | RX8MAA | 0.3 | ||
| CL4 | Perform Software Check and Update the AV Control Unit | RX05AA | ZE | 32 | 0.5 |
| CL5 | Perform Software Check and Update the AV Control Unit | RXB7AA | 0.3 | ||
| CL6 | Perform Software Check and Update the AV Control Unit | RX5AAA | 0.3 | ||
| CL7 | Perform Software Check and Update the AV Control Unit | RX0LAA | 0.3 |
Refer to the appropriate model for the Claims Information Identifier Code. The SYM and DIA codes are used for specific conditions, such as ZE and 32 for CL4.
Amendment History
This bulletin, NTB23-018, has undergone several revisions:
- March 8, 2023 (NTB23-018): Original bulletin published.
- March 10, 2023 (NTB23-018A): Infotainment Update-Software package numbers updated on pages 10, 15, 32, and 33.
- March 21, 2023 (NTB23-018B): Updated 2023 Altima column on page 5 and Infotainment Update-Software package numbers updated on page 13.
- April 12, 2023 (NTB23-018C): Changes made to the vehicle tables on pages 5, 8, 15, 17, 29, 30, and 34. Software Version Update Confirmation procedures removed.
- August 1, 2023 (NTB23-018D): Changes made to the vehicle tables on pages 7, 26, and 29.
- August 16, 2023 (NTB23-018E): A NOTICE statement was added to page 3.
New Feature: SXM Smart Favorites
For some vehicles, this software update introduces a new feature called "SXM Smart Favorites". This feature allows users to designate presets within the SXM1, SXM2, and SXM3 bands as Smart Favorites. When a Smart Favorite preset is selected, the current track on that station will play from the beginning of the song.
To program a Smart Favorite preset:
- Press the SXM button.
- Touch the "Setup" key.
- Touch the "Tune Start" key to activate (ON) or deactivate (OFF) Smart Favorites.
- Touch the "Add Preset" key to select an available preset.
Smart Favorites will start functioning only after the audio unit is turned on for a few minutes. "Tune Start" is supported for music channels only. If the system warns "At the End", it means no further skip back is possible.
Source: NHTSA ID 10243453
Galerie
69 images
Frequently Asked Questions
- What is Nissan TSB NTB23-018E about?
- Nissan TSB NTB23-018E provides a software update for the Audio/Video (AV) Control Unit in various 2014-2023 Nissan models. This update aims to address infotainment system issues, improve stability, and implement bug fixes.
- Which Nissan models are affected by infotainment issues addressed in NTB23-018E?
- This TSB applies to a wide range of 2014-2023 Nissan vehicles, including the Altima, Armada, Frontier, Kicks, LEAF, Maxima, Murano, NV, NV200, Pathfinder, Rogue, Rogue Sport, Sentra, Titan, and Versa models.
- What should I do if my Nissan Sentra infotainment system issues persist?
- If your Nissan Sentra infotainment issues continue, or if you suspect your vehicle needs this software update, you should schedule an appointment with an authorized Nissan dealer. They have the necessary tools and software (ASIST and special USB drive J-52727-1 / NI-52727-1) to diagnose and perform the update correctly.
- Are there any precautions I should be aware of regarding this update?
- Yes, several precautions are outlined in the TSB. These include not removing the USB drive during the update, not inserting the USB into a charging port, ensuring the ignition remains on, and performing specific reinitialization steps after the update. Owners will also need to re-pair their Bluetooth devices.
- Does this update add any new features?
- Yes, for some vehicles, this software update introduces a new feature called "SXM Smart Favorites." This allows users to designate SiriusXM presets as Smart Favorites, playing the current track from the beginning when selected.
Related Articles
2021-2024 Nissan ICC Inoperative with DTC C1A16 or C2582
Nissan has issued TSB NTB19-033G for 2021-2024 models experiencing Intelligent Cruise Control (ICC) malfunctions, AEB/FEB warning lights, or radar obstruction messages with DTCs C1A16 or C2582. The bulletin outlines diagnostic steps and potential ICC distance sensor replacement.
2020-2025 Nissan Sentra Loss of Power DTC P2100 P2101
Nissan has released TSB NTB25-005 for 2020-2025 Sentra models experiencing a loss of power. This issue is often accompanied by diagnostic trouble codes P2100 ('ETC MOT PWR-B1') or P2101 ('ETC FNCTN/CIRC-B1') stored in the Engine Control Module (ECM). The bulletin provides a revised diagnostic…
2020-2023 Nissan Models: DTC B2E1B-06 (Automatic eCall) Bulletin Inactive
Nissan Technical Service Bulletin NTB23-031A, concerning DTC B2E1B-06 (Automatic eCall) in various 2020-2023 models, has been declared inactive. Owners who previously encountered this diagnostic trouble code should note that this specific bulletin is no longer applicable.
2021-2024 Nissan Remote Command DTCs B2E4B-06, B2E60-06
Nissan has issued TSB NTB21-037D for 2021-2024 Sentra, Pathfinder, and Rogue models experiencing NissanConnect remote command issues with DTCs B2E4B-06, B2E60-06, B2E61-06. The problem is linked to a cloud-server, and replacing the TCU is not the solution. Learn what steps to take.
2021-2024 Nissan BCM Replacement Service Bulletin
Nissan TSB NTB20-074B provides crucial service information for replacing the Body Control Module (BCM) in 2021-2024 ARIYA, Pathfinder, Rogue, and Sentra vehicles. It outlines essential steps for module configuration and intelligent key pairing to prevent damage and ensure proper function.
Leave a comment
Comments are moderated and may take a moment to appear. Only your first name and the initial of your last name are shown publicly.
Comments
Be the first to comment.