2021 Audi A6 Sunroof Rattle Noise TSB
Audi Technical Service Bulletin 60 21 57 2054270/8 provides a comprehensive repair procedure for 2019-2021 Audi A6 and 2021 RS 6 Avant vehicles experiencing a rattling noise from the panoramic sunroof assembly, especially on rough roads. The TSB details steps involving felt tape application…
 Marcus Weber2021 Audi A6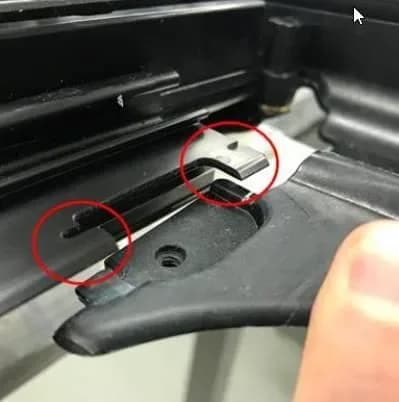
Audi has released Technical Service Bulletin (TSB) 60 21 57 2054270/8 to address a persistent rattling noise emanating from the central roof area or the panoramic sunroof assembly in certain 2019-2021 Audi A6 and 2021 RS 6 Avant vehicles. This TSB, issued on November 12, 2021, supersedes previous bulletin Group 60 number 20-49 dated December 18, 2020. The updated bulletin includes revised procedures, photos, warranty information, and required parts to effectively resolve the 2021 Audi A6 sunroof rattle noise.
Symptoms
Owners of affected vehicles may experience a distinct "rattling noise that sounds like it is coming from the central roof area or from the back of the sunroof assembly." This noise is most noticeable when driving on rough roads.
Technical Background
Audi has identified that the rattling noise in the panoramic sunroof is not due to a single cause but rather a combination of factors. The manufacturer has implemented several production improvements over time to mitigate these noises. However, for vehicles produced before these improvements were fully integrated, the repairs outlined in TSB 60 21 57 2054270/8 are necessary to ensure the noise is resolved.
Detailed Repair Procedure
Addressing the 2021 Audi A6 sunroof rattle noise involves a multi-step process that focuses on isolating contact points and lubricating moving parts within the sunroof assembly. This repair must be performed on both the left and right sides of the assembly.
Preparation and Access
- The glass sunroof panel must be removed. This step should be performed according to the specific instructions found in the Elsa Repair Manual.
- The roller shade is then closed by approximately 20cm. Figure 1 illustrates the roller shade in this partially closed position.
Roller Shade Isolation
- Loosen the roller shade from its drive cable. Push the roller shade material back to expose the mounting bolts, then remove these bolts completely (Figures 2-5). Figure 2 shows how to move the beam off the drive laterally, and Figure 3 depicts the beam removed. Figures 4 and 5 further detail pushing back the material and the location of the bolts to be removed.
- Slide the roller shade backward to remove it. Clean the mounting points thoroughly using cleaning solution D 009 401 04 or an equivalent surface preparation solvent, such as isopropyl alcohol or an adhesion promoter (Figures 6 and 7). This prepares the surfaces for the adhesive-backed felt strip material.
- Push down on the roller shade pan. Starting from the bottom of the guide rail, wrap the areas shown in Figure 8 with sections of felt tape part number 000 979 950. Fold the tape forward and over to the top of the guide rail to isolate both the top and bottom tabs (Figure 9).
- Apply thread locker to the screw hole indicated in Figure 10. Reinstall the bolts to the roller shade and torque them to 3 Nm (Figure 11).
Guide Rail Isolation and Lubrication
- On the front of the sunroof guide rail, loosen the bolt a few turns but do not remove it completely (Figure 12).
- Lift the guide rail slightly using a plastic wedge. Insert a 20mm x 20mm section of felt strip material part number 533 867 910 A between the guide rail and the frame (Figure 13). Remove the backing from the adhesive side and adhere the felt tape before tightening the screw. Reinstall the screw and tighten it to 5 Nm (Figure 14).
- On the rear of the sunroof guide rail, loosen the bolt a few turns but do not remove it completely (Figure 15).
- Insert a small plastic wedge between the guide rail and the frame, as indicated by the red arrow in Figure 16, to slightly separate the two parts. Apply special lubricant part number G 060 567 A2 between the guide rail and the frame, extending from the end of the rail to the bolt location. Tighten the bolt to 5 Nm.
Glass Panel Treatment
- Measure and mark the center of the glass sunroof panel structure. Clean this area with cleaning solution D 009 401 04 or an equivalent surface preparation solvent to prepare the surfaces. Apply a 20mm x 20mm section of adhesive felt strip material part number 533 863 288 A to this central area of the glass sunroof panel structure (Figures 17, 18, and 19).
Reassembly and Final Adjustments
- Reassemble all components that were loosened or removed during these repairs. Make any necessary adjustments to the sunroof glass panel according to the specifications found in the Elsa manual under "Body >> Body Exterior >> 60 Sunroof >> Sliding Sunroof >> Glass Panel, Adjusting." If necessary, reestablish all basic settings for the sliding roof and roller shade electronics.
Required Parts and Tools
To perform the repair for the 2019-2021 Audi A6 and 2021 RS 6 Avant sunroof rattle noise, specific materials are required:
- Fasteners, Bolts, Nuts, and Screws: As needed per the Repair Manual (See ETKA/ELSA)
- Adhesive Felt Strip: Part number 533863288A (Shop Supply)
- Felt Strip: Part number 533867910A (Shop Supply)
- Webbing Adhesive Tape: Part number 000979950 (Shop Supply)
- Special Lubricant: Part number G 060567A2 (Quantity: 0.10)
- Cleaning Solution: Part number D 00940104 or equivalent surface preparation solvent (e.g., isopropyl alcohol or adhesion promoter) (Quantity: 0.10)
Warranty Information
This repair is covered under Audi's warranty policy for up to 48 months or 50,000 miles, whichever comes first. For Certified Pre-Owned (CPO) vehicles, the claim type is G10, requiring owner verification. The damage code for this issue is 0020. Specific labor operations and time units (TU) include:
- Roller Shade Repair (Service Number 6028):
- Glass tilting roof panel remove + reinstall (Labor Operation: 6039 1900)
- Sun shade removal + reinstall (Labor Operation: 6070 1950)
- Isolate points of contact in roller shade (Labor Operation: 6070 4199, 20 TU)
- Guide Rail Repair (Service Number 6028):
- Glass tilting roof panel remove + reinstall (Labor Operation: 6039 1900)
- Sun shade removal + reinstall (Labor Operation: 6070 1950)
- Isolate points of contact in the guide rail (Labor Operation: 6035 4299, 15 TU)
- Glass Sunroof Panel Repair (Service Number 6039):
- Glass tilting roof panel apply felt material (Labor Operation: 6039 4999, 5 TU)
Diagnostic time (GFF) has no allowance (0 TU). Road tests before and after the service procedure are allocated 10 TU each (Labor Operations 0121 0002 and 0121 0004, respectively).
Important Warnings
Owners should be aware that if their vehicle is outside of its warranty coverage, this Technical Service Bulletin serves as informational guidance only. In such cases, the repair costs may not be covered by Audi.
Source: NHTSA ID 10203480
Galeria
18 imagens
Frequently Asked Questions
- What causes the rattling noise in my 2019-2021 Audi A6 or 2021 RS 6 Avant sunroof?
- The rattling noise in the panoramic sunroof of these Audi models is attributed to multiple factors, not a single cause. It typically occurs due to contact between various components within the sunroof assembly, especially when driving on uneven surfaces, and is addressed by TSB 60 21 57 2054270/8.
- How is the 2021 Audi A6 sunroof rattle noise fixed according to TSB 60 21 57 2054270/8?
- The repair involves a detailed procedure outlined in Audi TSB 60 21 57 2054270/8. This includes removing the glass panel, cleaning specific areas, applying various types of felt tape (000979950, 533867910A, 533863288A) to isolate contact points, lubricating guide rails with special lubricant G 060567A2, and making necessary adjustments to the sunroof's basic settings.
- What parts are used to repair the sunroof rattle in my Audi A6 or RS 6 Avant?
- The repair for the 2021 Audi A6 sunroof rattle noise requires specific parts such as adhesive felt strips (533863288A, 533867910A), webbing adhesive tape (000979950), special lubricant (G 060567A2), and cleaning solution (D 00940104 or equivalent).
- Is the sunroof rattle repair covered under warranty for my 2019-2021 Audi A6 or 2021 RS 6 Avant?
- Yes, this repair is typically covered under Audi's new vehicle limited warranty for up to 48 months or 50,000 miles. For Certified Pre-Owned (CPO) vehicles, it may also be covered under claim type G10. If your vehicle is outside of these warranty periods, the TSB serves as informational guidance for repairs, and costs may not be covered.
Related Articles
2021 Audi A6 Problems: Recalls, Complaints & TSBs
The 2021 Audi A6 has been subject to several recalls, primarily concerning its electrical system and suspension components. While no owner complaints or federal investigations have been reported, numerous technical service bulletins address issues ranging from engine stalling and transmission…
2021 Audi A6/A7/S6/S7 Engine Coolant Service Action 19P9 Closure
Audi has issued a closure notice for Service Action 19P9, related to engine coolant concentration, affecting 2021 Audi A6, A7, S6, and S7 models. This notice sets deadlines for dealers to submit claims for completed work.
2021-2025 Audi A4, A6, Q5 Drive Belt Noise TSB 2061461/15
Audi Technical Service Bulletin 2061461/15 addresses grinding, squeaking, or tweeting noises from the starter/generator drive belt, or the belt falling off, in 2021-2025 Audi A4, A6, and Q5 models with the 2.0L TFSI engine. It also covers the 'Electrical system: Malfunction!' warning.
2019-2026 Audi A6/A7 Air Suspension Compressor TSB
Audi has issued Technical Service Bulletin 2062932/2 for 2019-2026 A6 and A7 models concerning inaccurate air suspension compressor pressure readings displayed by the J775 control module. This TSB outlines a diagnostic procedure using a special tool.
2019-2025 Audi Starter/Generator Belt Noise TSB 2061461/14
Audi TSB 2061641/14 addresses starter/generator drive belt noise or detachment in 2019-2025 A4, A5, A6, A7, and Q5 2.0TFSI mild Hybrid models. Symptoms include engine noises and the warning 'Electrical system: Malfunction! Please go to workshop'. The TSB details diagnostic and repair steps for…
Leave a comment
Comments are moderated and may take a moment to appear. Only your first name and the initial of your last name are shown publicly.
Comments
Be the first to comment.